Thursday, February 24, 2011

Frugal Friday

Today I'm linking up with "Frugal Friday" at
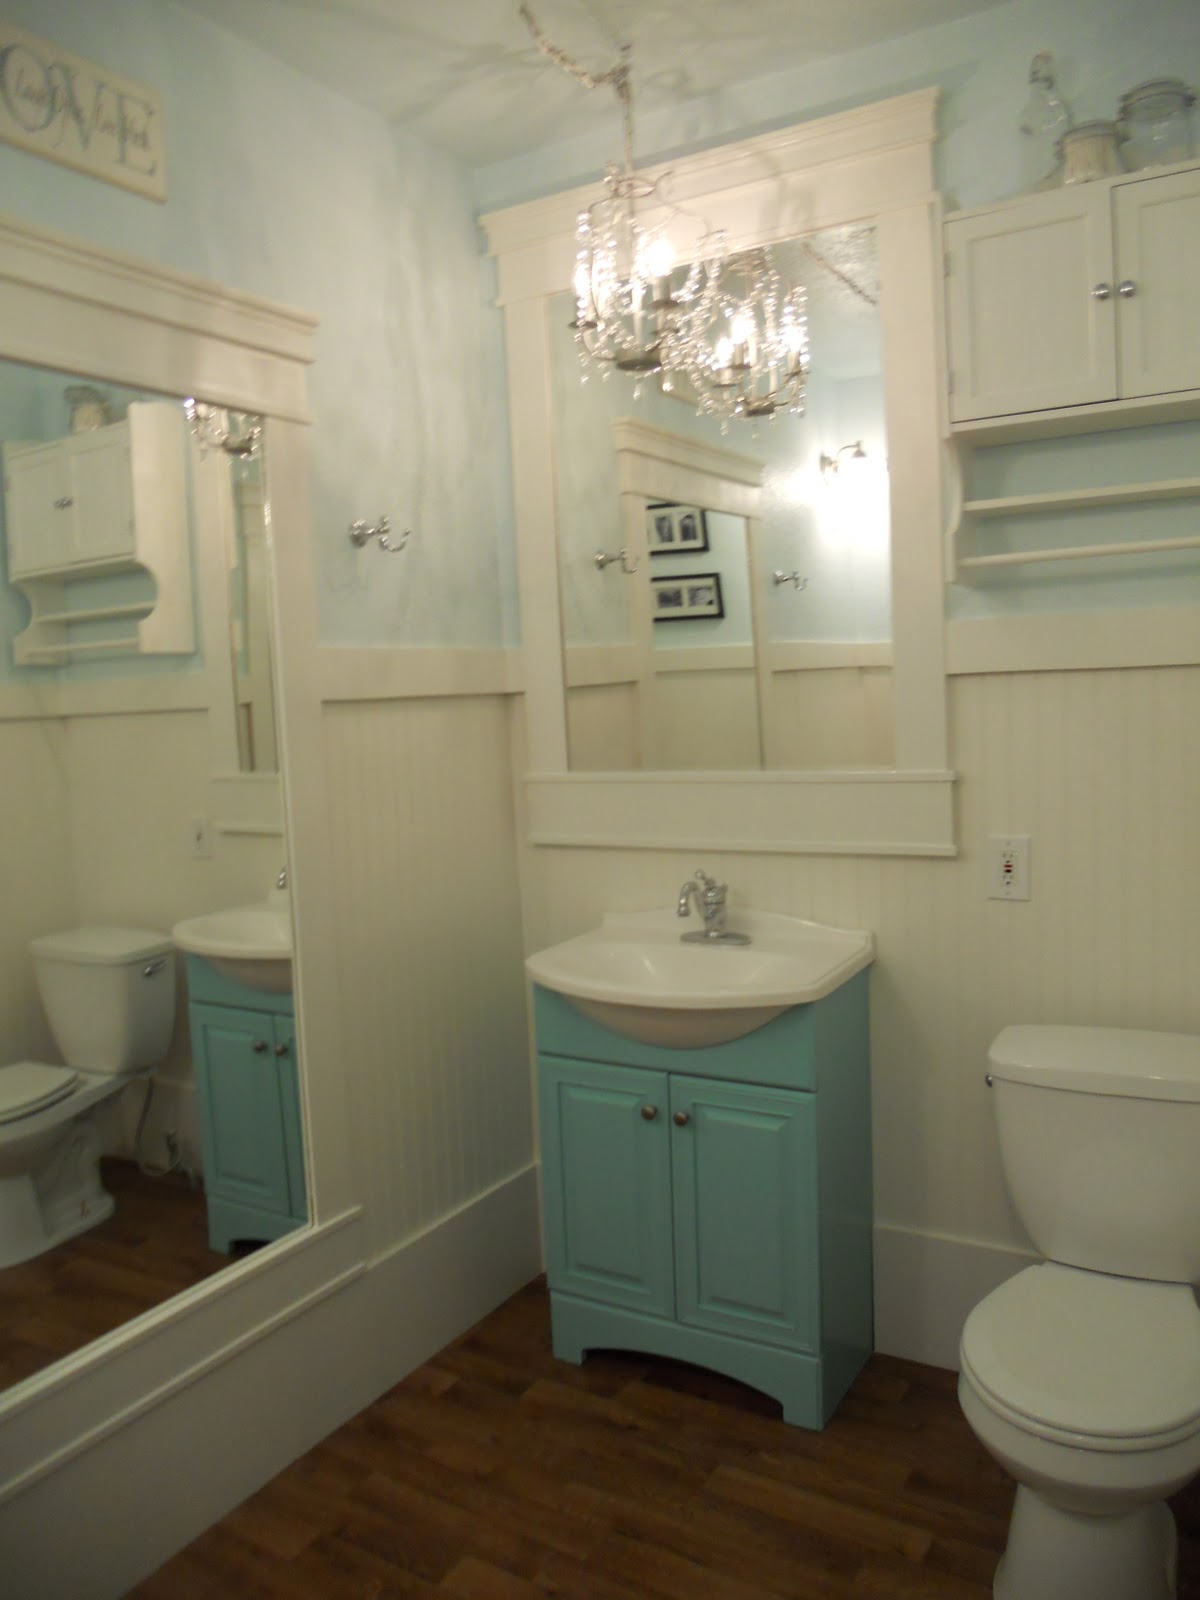
Now, most wouldn't think that a complete overhaul bathroom remodel would be Frugal but you'd be surprised.

Normally, I don't like spilling the beans on money.  We don't have a lot of it, and if I have some, I feel like I'm bragging.  But our entire bathroom.. ripping out all joists, replacing all walls, etc totaled out at 
$1,154
FOR EVERYTHING.

To me, that is a steal. My goal was to get it under $800, (I had $400 / month remodel budget) but you know how all the little things start adding up.

Vanity $100 (used craigslist)
Floor joists / subfloor $300
Vinyl and tape $85 
Drywall and supplies $80
Beadboard $80
Pocket door frame $100
Pocket door Revamp (with plexiglass and vinyl sticker) $70
Paint $60
Trim $50 
Chandelier $45
Electrical  wiring/switches/outlets $20
Plumbing pipes, valves $30 
Faucet $90
(2) Rob hooks $30
Screws, nails, misc $14

Seems like a lot of money to me but considering it probably adds about $10,000 equity in the house... 
seems like a great deal to me!
And now I get to enjoy it, instead of doing it just to get it sold.


Saturday, February 19, 2011

Bathroom Reveal


It all started when I found this vanity.  I thought I'd use it to do this... 

Simple remodel. Remove the double vanity... replace with single.. gain space

Yea right~!

Ended up ripping out EVERYTHING, replacing joists (all of them), all subfloor, new vinyl, new walls, etc..

It was tricky because we couldn't remove the clawfoot tub down the 24" hallway.  So we had to rip out half the floor, replace everything.. then move the clawfoot to the "new" side and replace the other side. 


Some process.
In moving the clawfoot around, I realized it would work  much better on the "vanity" wall. So I rearranged the  plumbing to accomidate.
So... without further ado...


I made the door myself out of the old door. I cut a hole in the middle, frosted plexiglass... put moulding around and added custom vinyl decal. And now it's a pocket door.  (I'll post a "How To" later)


The sink got moved to the tub pluumbing area.  So much more spacious!


The large mirror right as you walk in is the old vanity mirror that was horizontal.  I glued it onto some hardboard, let it sit for 72 hours.  Then I screwed the exposed hardboard into studs then trimmed out the rest.   The tub still needs a D shape clawfoot rod and curtains, 

and a glass shelf over the toilet.  

But it's been 7 weeks and my husband is done having a construction zone.

COLORS
The tub and vanity
Behr Eucalyptus Leaf

The upper wall in Satin
Behr Aqua Breeze

And the beadboard and all trim in semi-gloss
Behr Swiss Coffee

Tuesday, February 1, 2011

Making the faucet fit

I was so excited when I got my faucet in the mail from CSN.  I got THIS one.
It called for a 4" holes and that is what mine were, so I thought it'd be fine.

But what I had was (3) 1" holes... and what I mainly needed was just a single 1.5" hole in the middle.  With the water supply lines and the screw to secure it, it just wouldn't come close to fitting.  I could dress all the kids (30 minutes), load them into the car (10 minutes), drive to Home Depot (20 minute), unload the kids (5 minutes), buy a 1.5" carbide bit (15 minutes + $20), drive home (20 minutes), and unload the kids (10 minutes).  That's almost 2 HOURS!!! (and $20 plus gas) So I just decided to use what I had.
I do not own a hack saw... shameful,  I know. 

So I took my wood saw and SLOWLY sawed 1/8" deep into the porcelan.  This took about 30 minutes but it seriously felt like forever, especially when 30 minutes = 1/8" progress!  
That's ONE HOUR and  $0.  A much better choice!

Then I could start chipping away with my wood chisel, I know, fully equipped with all the RIGHT tools (**rolls eyes**) This took another 30 minutes and was quite messy with porcelain chips flying EVERYWHERE. I went about half way down, then turned it upside-down and started chipping from the bottom.

I sanded the edges and there you have it... ugly as can be!

But the faucet now FITS... and you can't see any ugliness at all.  I LOVE LOVE LOVE this faucet, so old fashioned looking. All the old fashioned looking ones I would find had  cold and hot levers. With kids, I am just afraid they would only turn on the hot and scald their lil' hands.  So, I can't wait to get it all hooked up!

And I'm waiting for my February remodeling budget allotment, which is why the walls are still lacking drywall and beadboard.